User Guide
Explore our guide to use Arrow
Welcome to Arrow User Guide! This user guide will give you a descriptive instruction on how to use Arrow. The words in italic are terms you may be unfamiliar with. And if that is the case, do not hesitate to check them out in Glossary.
Arrow is a desktop app that help software project managers keep track of their members’ tasks and deliverables. By associating tasks to specific teammates, users can keep track of what needs to be done and have quick access to contact information should they wish to reach out to the teammate. More specifically, apart from the command box, there are two main lists which store the tasks list and the teammates list. In this way, our users can use two lists to organize the team project easily.
Arrow uses a Command Line Interface (CLI) and at the same time possesses the convenience of a Graphical User Interface (GUI). The main target users are software project managers, who should be equipped with Command Line Interface (CLI) skills. And if you can type fast, Arrow can help you manage your tasks in an exceptionally quick way.
Note
![]() If you are unfamiliar with Command Line Interface (CLI):
If you are unfamiliar with Command Line Interface (CLI):
Arrow has the target audiences of software project managers.
In this circumstance, we assume users having some experience of using the command line.
However, it’s perfectly fine if you do not know how to use CLI.
Click here to learn more about what is CLI.
Table of Contents
- Quick Start
- Overview of Features
- Command Summary
- FAQ
- Tutorial for CLI
- Behind Everything
- Glossary
Quick Start
-
Ensure you have Java
11or above installed in your Computer. If you are unsure of how to check, refer to the FAQ. -
Download the latest
arrow.jarfrom here. - Copy the file to the folder you want to use as the home folder for Arrow.
-
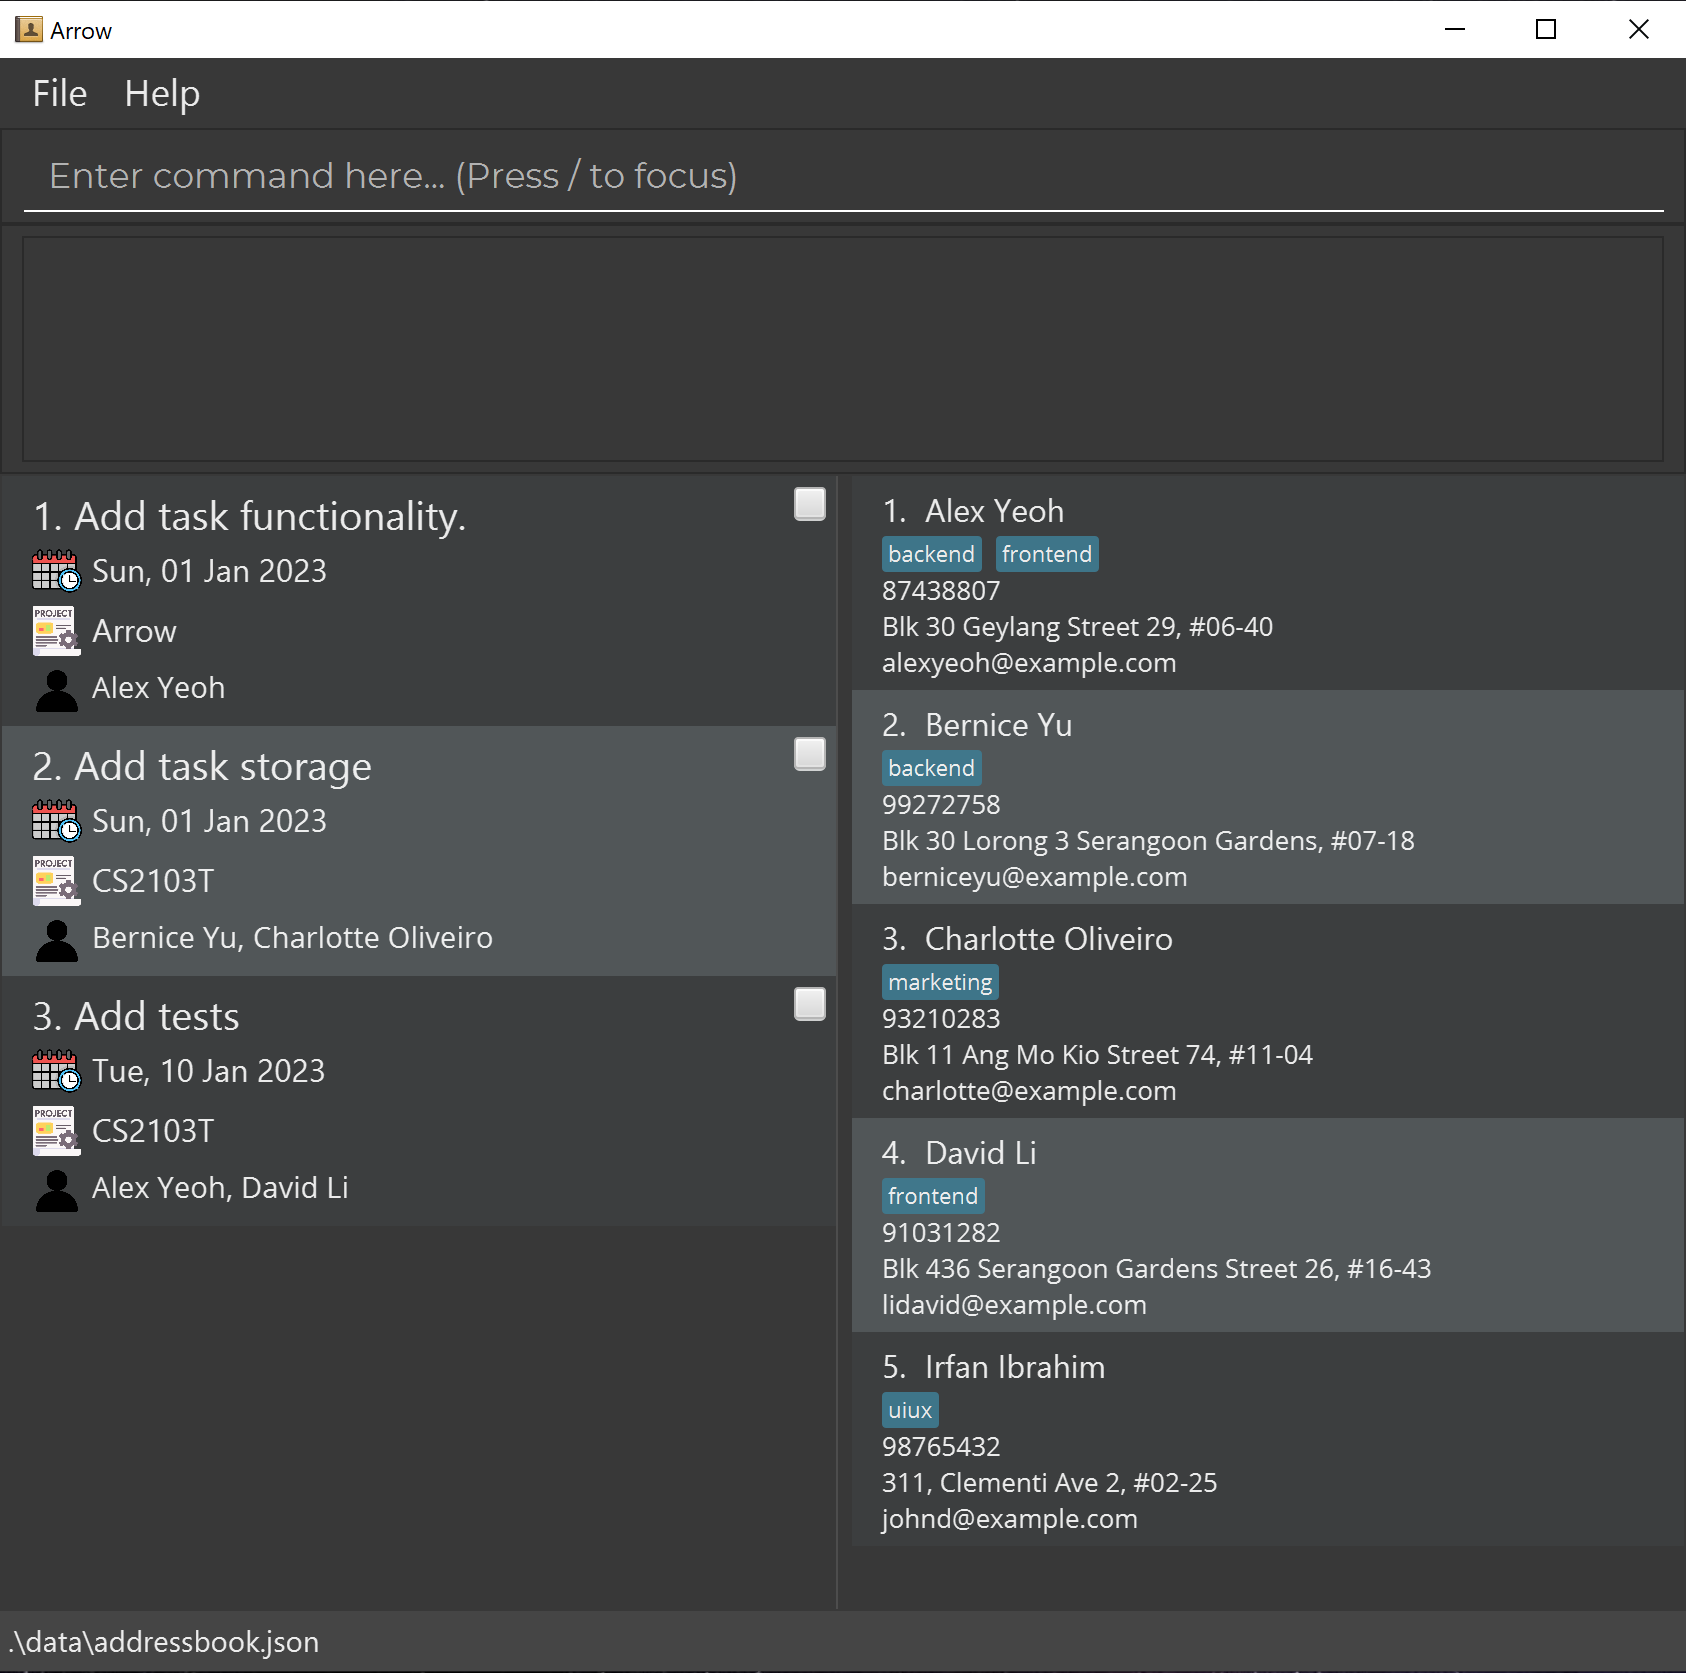
Double-click the file to start the app. The GUI or main window should appear in a few seconds. Note how the app contains some sample data. If the app does not start and an
errorappears on your screen, do refer to the FAQ. - The picture below shows the main window of Arrow.
- The command box is boxed in red, where you enter commands.
- The task panel is boxed in blue, where you can see the current task list.
- The address book is boxed in green, where you can see the contact information of your teammates.
-
Type the command in the command box and press Enter to execute it. e.g. typing
helpand pressing Enter will open the help window.
Some example commands you can try:-
list: Lists all teammates. -
exit: Exits the app.
-
- Refer to the Features section below for details of each command.
Overview of Features
This section provides a brief overview of Arrow. The intention is for users to gain a better
understanding of basic functionalities of Arrow, before diving into specific commands.
-
Basic functionality
- Clear all Teammates’ records
- Clear all Task records
- Get Help
- Exit app
-
Managing Teammate Information
- Adding a new Teammate
- Listing all Teammates
- Deleting a Teammate
- Editing a Teammate’s information
- Finding Teammate(s) based on name/keyword/tag
-
Managing Task Information
- Adding a new Task
- Assigning a Task to a Teammate
- Viewing all Tasks assigned to a Teammate
- Marking completed Tasks
- Unmarking incomplete Tasks
- Deleting a Task
- Setting deadlines to a Task
- Sorting Task by deadline
- Filtering Task by
- Description
- Project Title
- Assigned Contacts to Task
- Deadline
- Completion Status
- Editing a Task
- Listing all project title
Features
If you are new to Arrow, here provides some tips for you to enter commands efficiently.
![]() Notes about the command format:
Notes about the command format:
-
The task list shows only INCOMPLETE tasks. Once a task has been marked (either by the command or by ticking the white box), it will be completed and disappears from the task panel as it is NOT incomplete.
-
To view the task list with both complete and incomplete ones, using
task list -a. -
Words in
UPPER_CASEare the parameters to be supplied by the user.
e.g. inadd n/NAME,NAMEis a parameter which can be used asadd n/John Doe. -
Items in square brackets are optional.
e.g.n/NAME [t/TAG]can be used asn/John Doe t/friendor asn/John Doe. -
Items with
… after them can be used multiple times including zero times.
e.g.[t/TAG]…can be used ast/friend,t/friend t/familyetc. -
Parameters can be in any order.
e.g. if the command specifiesn/NAME p/PHONE_NUMBER,p/PHONE_NUMBER n/NAMEis also acceptable. -
If a parameter is expected only once in the command, but you specified it multiple times, only the last occurrence of the parameter will be taken.
e.g. if you specifyp/12341234 p/56785678, onlyp/56785678will be taken. -
Extraneous parameters for commands that do not take in parameters (such as
help,list,exitandclear) will be ignored.
e.g. if the command specifieshelp 123, it will be interpreted ashelp. -
INDEXmust a positive integer of the given item in the panel.
Basic Commands
This section covers basic application-related commands.
Clearing all Teammates : clear
Clears all Teammates from the address book.
Format: clear
Clearing all tasks from Task Panel: task clear
Clears the tasks from tasks list.
Format: task clear
Examples:
-
task listfollowed bytask clearto delete all incomplete tasks.
Viewing help : help
Shows a message explaining how to access the help page.

Format: help
Exiting the program : exit
Exits the program.
Format: exit
Teammate Commands
Teammate entails all the members that you can assign tasks to in the future. This section documents how to use add, delete, edit and list operations on teammate records.
Adding a new Teammate: add
Adds a new Teammate to the address book.
Format: add n/NAME p/PHONE_NUMBER e/EMAIL a/ADDRESS [t/TAG]…
-
TAGcan only be 1 word.
Examples:
add n/John Doe p/98765432 e/johnd@example.com a/John street, block 123, #01-01add n/Betsy Crowe t/friend e/betsycrowe@example.com a/Newgate Prison p/1234567 t/criminal
Listing all Teammates : list
Shows a list of all teammates in the address book.
Format: list
Deleting a Teammate : delete
Deletes the specified Teammate from the address book.
Format: delete INDEX
- Deletes the teammate at the specified
INDEX. - The index refers to the index number shown in the displayed teammate list.
- The index must be a positive integer 1, 2, 3, …
Examples:
-
listfollowed bydelete 2deletes the 2nd teammate in the address book. -
find Betsyfollowed bydelete 1deletes the 1st teammate in the results of thefindcommand.
Note:
- This teammate will also be deleted from all tasks he is assigned to. Task panel will be filtered to show you the affected tasks!
- Enter
task listto view all tasks again.
Editing a Teammate’s information : edit
Edits an existing Teammate in the address book.
Format: edit INDEX [n/NAME] [p/PHONE] [e/EMAIL] [a/ADDRESS] [t/TAG]…
- Edits the teammate at the specified
INDEX. The index refers to the index number shown in the displayed teammate list. The index must be a positive integer 1, 2, 3, … - At least one of the optional fields must be provided.
- Existing values will be updated to the input values.
-
TAGcan only be 1 word. - When editing tags, the existing tags of the teammate will be removed i.e. adding of tags is not cumulative.
- You can remove all the teammate’s tags by typing
t/without specifying any tags after it.
Examples:
-
edit 1 p/91234567 e/johndoe@example.comEdits the phone number and email address of the 1st teammate to be91234567andjohndoe@example.comrespectively. -
edit 2 n/Betsy Crower t/Edits the name of the 2nd teammate to beBetsy Crowerand clears all existing tags.
Note:
- This teammate’s details will also be edited under all tasks he is assigned to. Task panel will be filtered to show you the affected tasks!
- Enter
task listto view all tasks again.
Finding Teammate(s) based on name/keyword/tags: find
Finds teammates whose names contain any of the given name/keywords, or teammates who contain any of the given tags.
Format: find [NAME/KEYWORD]… [t/TAG]…
- At least one keyword/tag has to be provided.
- The search is case-insensitive. e.g.
hanswill matchHans - The order of the keywords does not matter. e.g.
Hans Bowill matchBo Hans - For names/keywords, only the name is searched.
- Partial names/keywords will be matched e.g.
Hanwill matchHans - Only full tags will be matched e.g.
t/frontendwill only match witht/frontend - Teammates matching at least one keyword/tag will be returned (i.e.
ORsearch). e.g.Hans Bowill returnHans Gruber,Bo Yang.
Examples:
-
find JohnreturnsjohnandJohn Doe -
find t/frontendreturnsAlex Yeoh -
find John t/frontendreturnsjohn,John DoeandAlex Yeoh -
find alex davidreturnsAlex Yeoh,David Li

Task Management Commands
A team Leader in Arrow may have tasks to complete or assign to Teammates.
In the Task panel, all tasks are shown coupled with who it has been assigned to.
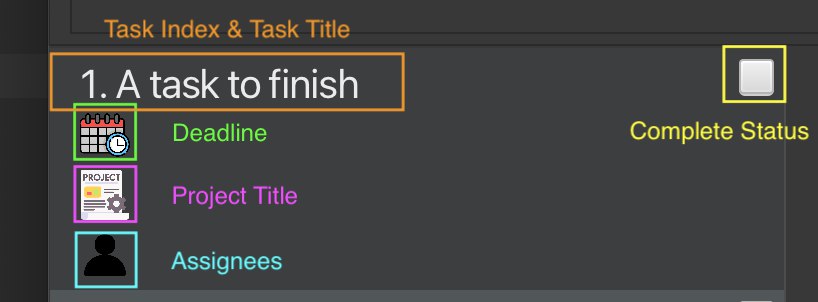
A Task has the ability to store these details:
-
Index: The index of the task in the Tasks panel -
Title: Description of the task -
Deadline: Deadline given to the Task -
Project: Project of the task -
Assigned Teammates: Teammates who have been assigned
All task-related commands have the keyword
taskin front of them. These commands modify the Task panel ofArrow.
Adding a new Task: task add
Adds a new task to the task panel.
Format: task add TITLE
-
TITLErefers to the task and cannot be empty. - Tasks with the same
TITLEcannot be added and will result in an error message.
task list -c), the newly added task will not show up in the list. You can view it by running the command task list to show incomplete tasks or task list -a to show all tasks.
Examples:
task add Task 1task add Finish GUI
Assigning a Task to a Teammate: task assign
Assigns or unassigns the specified teammate from address book to a task from task panel.
Format: task assign TASK_INDEX [+@TEAMMATE_INDEX]… [+@TEAMMATE_NAME]… [-@TEAMMATE_INDEX]… [-@TEAMMATE_NAME]…
- +@: Assigns the teammates at the specified TEAMMATE_INDEXs, or with the TEAMMATE_NAME, from
address bookto task at the specified TASK_INDEX fromtask list. - -@: Unassigns the teammates at the specified TEAMMATE_INDEXs, or with the TEAMMATE_NAME, from
address bookfrom task at the specified TASK_INDEX fromtask list.
Examples:
-
task assign 1 +@1 +@Alex Yeoh -@Bernice Yuassigns the 1st teammate and “Alex Yeoh” from the address book to the 1st task from task list, and unassigns “Bernice Yu” from the same task.
Marking a Task: task mark
Marks a task as complete.
Format: task mark TASK_INDEX
- Marks the task at the specified
TASK_INDEXas complete. - The index refers to the index number shown in the displayed task list.
- The index must be a positive integer 1, 2, 3, …
Examples:
-
task listfollowed bytask mark 1marks the 1st task in the task list as complete.
Unmarking a Task: task unmark
Unmarks a task and sets it as incomplete.
Note;
- To unmark a task, we need to show the full list of tasks with the completed (disappeared) tasks.
- By executing
task list -acommand, we can fully display the task panel with both complete and incomplete tasks. - Thus we can
unmarka task from complete to incomplete.
Format: task unmark TASK_INDEX
- Show the full task lists by using
task list -a. - Unmarks the task at the specified
TASK_INDEX. - The index refers to the index number shown in the displayed task list.
- The index must be a positive integer 1, 2, 3, …
Examples:
-
task list -afollowed bytask unmark 1unmarks the 1st task in the task list and sets it as incomplete.
Deleting a Task: task delete
Deletes the specified task from the task panel.
Format: task delete TASK_INDEX
- Deletes the task at the specified
TASK_INDEX. - The index refers to the index number shown in the displayed task list.
- The index must be a positive integer 1, 2, 3, …
Examples:
-
task listfollowed bytask delete 2deletes the 2nd task in the task panel.
Setting deadlines to a Task: task do ... by/
You can use the task do ... by/ command to set (or remove) a deadline for some task.
Format: task do TASK_INDEX by/DATE...
- The
task docommand sets the deadline specified byDATEto the task at the specifiedTASK_INDEXfrom the task list. - You can only use plain English to describe the intended deadline, such as
today,tomorrow,next Thursday,14 November 2022, and so on. - Dates containing non-alphanumeric characters such as
11-11-2022will not be accepted and an error message will be thrown. - If the application is unable to determine a date from your input, an error message will be displayed, and you will be prompted to try a different input.
- To remove the deadline from a task, you can use the special character
?.
Examples:
-
task do 1 by/tomorrowsets the deadline for the 1st task in the list to tomorrow. -
task do 1 by/?removes the deadline from the 1st task in the list.
![]() Additional Notes:
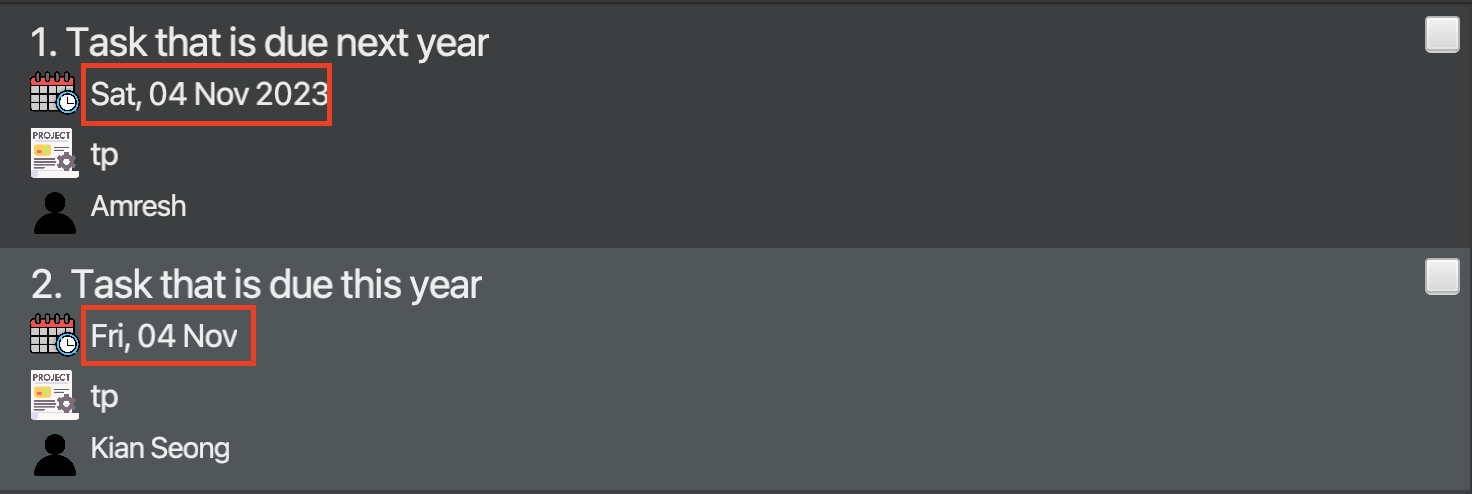
Additional Notes:
- As we foresee that most of your tasks should fall within the current year, the deadline of such tasks have their year omitted in the task panel.
- You may refer to the screenshot below for a better understanding
Sorting tasks by deadline: task sort
Sorts the task list by deadline. Tasks with earlier deadlines will be put at the top, while tasks without any deadlines will be at the bottom.
![]() Additional Notes:
Additional Notes:
- After this command is run, the task panel will only show incomplete tasks.
Format: task sort
Filtering the Tasks List: task list
The task list command is a powerful command that allows you to focus only on the tasks that matter to you.
Format: task list [KEYWORD] [#PROJECT_NAME]... [@TEAMMATE_INDEX]... [before/DATE] [after/DATE] [-a] [-c]
The format above may look daunting, but this is only because the task list command allows you to potentially describe complex queries.
However, all the parameters are optional, and in most cases, you will only need a simple query that uses just one or two parameters.
For ease of understanding, many of these common use cases have been detailed below.
1. Filtering by Completion Status
Format: task list [-a] [-c]
- The simplest form of the command is simply
task list. This allows you to view all incomplete tasks. - You may find this command useful to reset your task list back to its default state.
Examples
-
task list -areturns all tasks, regardless of completion status. -
task list -creturns all completed tasks only.
![]() Additional Notes:
Additional Notes:
- When the
-aor-cparameters are not specified, thetask listcommand returns all incomplete tasks that match the given query.
- In the following examples, ‘all tasks’ will refer to ‘all incomplete tasks’ for brevity.
2. Filtering by Description
Format: task list KEYWORD
- The
KEYWORDparameter allows you to search for tasks that containKEYWORD.
Example
-
task list fixreturns all tasks whose description contains the keywordfix.
3. Filtering by Project
Format: task list #PROJECT_NAME...
- The
#parameter allows you to search for tasks that are assigned to any of the project(s) you specify.
Example
-
task list #CS2101 #CS2103Treturns all tasks that are either under the projectCS2101orCS2103T.
4. Filtering by Assigned Contact(s)
Format: task list @TEAMMATE_INDEX...
- The
@parameter allows you to search for tasks that are assigned to all the contact(s) you specify. - Shows the tasks of the specified
TEAMMATE_INDEX. - The contact refers to the index number shown in the displayed teammate list.
- The index must be a positive integer 1, 2, 3, …
Example
-
task list @1 @2returns all tasks that are assigned to both the 1st and 2nd teammates from the address book.
5. Filtering by Deadline
Format: task list before/DATE after/DATE
- The
before/andafter/parameters allow you to specify a date range to filter the tasks by, according to their deadline. -
- Tasks with unspecified deadlines will be displayed regardless of the filters.
- You can choose to use only one of the parameters, as shown in the examples below.
Examples
-
task list before/ next Monday after/ tomorrowreturns all tasks whose deadline is after tomorrow but before next Monday. -
task list before/ end of the monthreturns all tasks whose deadline is before the end of the month.
![]() Tips for Advanced Users:
Tips for Advanced Users:
- You can use any combination of the parameters above to build a query that matches your unique requirements!
- Do note that the
KEYWORDparameter must come first, if any other parameters are used.
Editing a task: task edit
Edits an existing task in the task list.
Format: task edit TASK_INDEX [ti/TITLE] [by/DEADLINE] [#/PROJECT]
- Edits the task at the specified
TASK_INDEX. The index refers to the index number shown in the displayed task list. The index must be a positive integer 1, 2, 3, … - At least one of the optional fields (
TITLE,DEADLINE,PROJECT) must be provided. If none are provided, the application will give an error. - Existing values will be updated to the input values.
Listing all projects: task project
Lists all the projects present in the task panel.
Projects of hidden tasks will also be shown.
task editcommand. The task panel will not be changed to show only tasks with project.
Format: task project
Saving the data
Arrow data are saved in the hard disk automatically after any command that changes the data. There is no need to save manually.
Arrow data are saved as JSON files, one for AddressBook (Teammates) and one for TaskPanel (Tasks).
- AddressBook:
[JAR file location]/data/addressbook.json - TaskPanel:
[JAR file location]/data/taskpanel.json
Proposed Features
Features to implement in the coming versions.
Sort Teammates by name
Sort Teammates by alphabetical order of their names. Currently, it is difficult to search for specific Teammates if the list becomes too long. This feature would allow easier finding of Teammates as there is an order in the list of Teammates.
Recurring Tasks
Extensive project management is planned for future iterations, to allow for better planning. This will also add the ability to add tasks of the same name (different projects) since categorisation will be done by projects instead.
Command Summary
This summary provides a list of useful and straightforward instructions on how to use the command lines more efficiently.
Basic Commands Summary
| Command | Format |
|---|---|
| User Manual | help |
| Clear Teammates | clear |
| Clear Tasks | task clear |
| Exit | exit |
Teammate Commands Summary
| Command | Format | Example |
|---|---|---|
| Add | add n/NAME p/PHONE_NUMBER e/EMAIL a/ADDRESS [t/TAG]… |
add n/James Ho p/22224444 e/jamesho@example.com a/123, Clementi Rd, 1234665 t/friend t/colleague |
| List | list |
- |
| Delete | delete INDEX |
delete 3 |
| Edit | edit INDEX [n/NAME] [p/PHONE_NUMBER] [e/EMAIL] [a/ADDRESS] [t/TAG]… |
edit 2 n/James Lee e/jameslee@example.com |
| Find | find [KEYWORD]… [t/TAG]… |
find James Jake t/frontend t/backend |
Task Commands Summary
| Command | Format | Example |
|---|---|---|
| Task add | task add TITLE |
task add Test 1 |
| Task assign | task assign TASK_INDEX [+@/TEAMMATE_INDEX]… [+@/TEAMMATE_NAME]… [cd/TEAMMATE_INDEX]… [-@/TEAMMATE_NAME]… |
task assign 3 +@/1 +@/Alex Yeoh @-/2 |
| Task list | task list |
- |
| Task mark | task mark TASK_INDEX |
task mark 1 |
| Task unmark | task unmark TASK_INDEX |
task unmark 1 |
| Task delete | task delete INDEX |
task delete 3 |
| Task do | task do TASK_INDEX by/DATE... |
task do 1 by/tomorrow |
| Task sort | task sort |
- |
| Task filter | task list |
- |
| Task edit | task edit TASK_INDEX [ti/TITLE] [by/DEADLINE] [#/PROJECT] |
task edit 2 ti/Finish bar by/tomorrow |
| Task project | task project |
- |
FAQ
Q: How do I check my Java version?
A: Open Terminal if you’re on Mac or Command Prompt if you’re on Windows. Type “java -version” and press Enter.
Q: How do I install java 11?
A: Download java 11 to your computer via this link.
Q: If I already have java on my computer, but not java 11, how do I switch java version to java 11?
A: For MacOS user, check this tutorial.
For Windows user, check this tutorial.
Q: What if the app does not open when I double-click it?
A: Follow the steps listed to open the app.
- Ensure that you have done Step 1 to 3 in the Quick Start.
- Open Terminal app if you are on a Mac or the Command Prompt if you are on Windows.
- Type “java -jar “ into Terminal or Command Prompt (do not do anything else).
- Go to the folder where you just copied
arrow.jarto. - Drag
arrow.jarand drop anywhere into Terminal or Command Prompt. - Press Enter and the command will run, the GUI will pop up.
Q: How do I transfer my data to another Computer?
A: Install the app in the other computer and overwrite the empty data file it creates with the file that contains the data of your previous Arrow home folder.
Tutorial for CLI
A command-line interface (CLI) is a text-based user interface (UI) used to run programs, manage computer files and interact with the computer.
This article showed you several “unknown-to-many” commands you can use to get access to hidden functionalities on your personal computer.
Some of our features
To improve the speed of your actions and quality of your life while using the application we have also implemented the below features
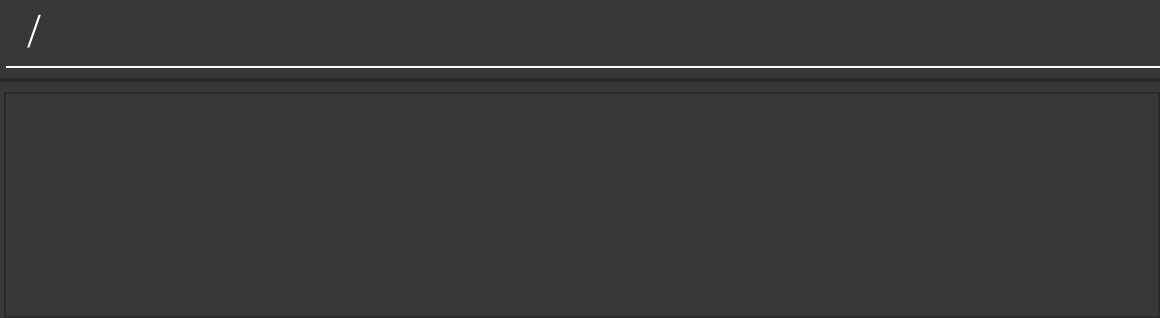
- When your command box is out of focus and empty, you can press the
/key on your command to immediately put your cursor on the command box.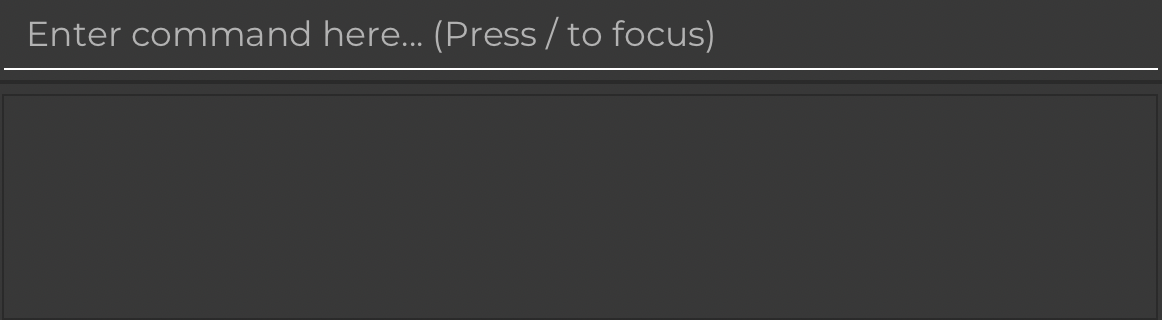 The command box will be focused and appears as below. A slash will appear and you will have to delete it before entering the next command.
- When you enter a command, it disappears from the command box is run by the application. You may use the
UParrow key to go back to a previous command orDOWNarrow key to go to the next command. However, if there is text entered, then you cannot use this feature.
Behind Everything
Why we are using two different lists?
- Task Panel List
As software project team leaders, it is important to have a clear vision of tasks to be implemented, since there could be many projects and each project may have so many items to keep in track. Thus, Arrow has a task panel list to keep every task organized. Details of each task can be added, which helps the team managers no fear of leaving out any progress.
Also, the task panel list only shows the incomplete tasks.
-
Teammate List
The most important part of a software project is the team members serving at different positions, Arrow helps tracking details of every team member and links them to their tasks to be finished.
Glossary
| Term | Definition |
|---|---|
| CLI | Command Line Interface is a text-based user interface (UI) used to run programs,manage computer files and interact with the computer. Click here if you are not familiar with CLI. |
| User Interface | The point at which human users interact with a computer, website or application. |
| GUI | Graphical User Interface is a type of user interface |
| Home Folder | The folder/directory where Arrow stores all information. |
| Main Window | The main window of the application that shows the list of teammates and tasks. |
| Command Box | The text box where you can enter commands. |
| Extraneous Parameters | The specified command contains more positional parameters than is allowed. |
This is the end of Arrow User Guide. If you have reached this far, thank you for reading and hope you have enjoyed using our app :)